

Taking Care of your Native American Flute |
 Like most instruments Native American Flutes are fragile and need to be cared for in order to keep that 'just like new' sound and appearance. Here are a some tips and advice which I hope you will find both useful and rewarding. |
About you Flute:
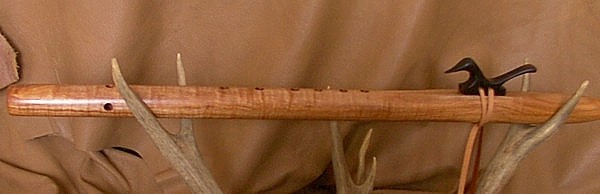
| Despite its initial appearance your Native American style Flute is a very complex instrument to which I will endeavor to apply a simple explanation: |
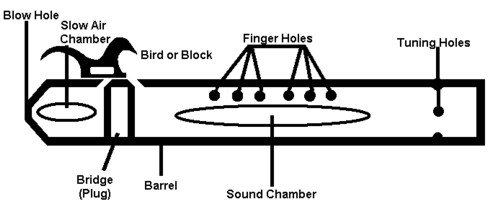 |
When you blow into
your flute, your breath enters a chamber known as the
Slow Air Chamber or SAC. This chamber is designed to
slow your breath down in order to supply the sound chamber
with a low pressure air supply. This helps to reduce
turbulence within your flute thus making it a playable
instrument. Your breath (air supply) then leaves the SAC through a carefully defined hole which is hidden beneath the 'Bird' or Block. The air then passes along a channel beneath the block which is either cut into the base of the bird (block) or along a channel made by a thin piece of additional wood, metal or leather, known as the nest. If your flute does not have a nest this in no way differentiates the playing ability of your flute. It is purely the choice of the flute maker to either use a nest or a groove in the base of the block. This 'focused' air is then allowed to pass over the sound hole which has also been crafted to precise dimensions with an internal cutting edge set at a precise angle. It is this action that makes your flute play. The air supply has now entered the second chamber of your flute and by shortening or lengthening the flute body, by placing your fingers over the various holes in the sound chamber, the notes it has been tuned to play will sound. The bird (block) has been designed to direct the air supply from the SAC to the sound hole and its position will affect the tone of the flute. Experiment by sliding the block backwards and forwards, a little at a time, until a desirable tone is achieved. Originally, Native American Flutes where not tuned to any particular scale as such things were not known at that time. However, as time progressed many older flutes were found to be tuned approximately to F# in the pentatonic scale. Further progressions of the flute made it possible to tune them to different keys although flute makers did have their own placements of the fingering holes, thus making each and every flute slightly different to play. This old tradition still continues, to some extent, to this day and you may find that your flute (say in the key of G) may sound slightly different to another made by a different maker when the same playing holes are covered or uncovered. However, it will soon become apparent that by making minor adjustments to your fingering, your flute can achieve the same notes as any similar flute and this is all part of understanding and getting to know your flute. A few words about tuning and 'Concert' tuned flutes. At the time of tuning a flute, a maker will make every effort to tune each playing hole (and the tuning holes - also known as direction holes) to the exact notes and will use either electronic devices, acoustic instruments or tuning forks to accurately achieve this. However, no matter how accurately a flute is tuned, its tuning is affected by temperature and humidity. As an example of this, let's take a flute that has been accurately tuned to the pentatonic scale of F in a workshop where the temperature is, say, 72 degrees. Once the flute is removed from that temperature controlled environment the tuning will alter. Extreme temperature changes can alter a flute tuned to F in the pentatonic scale to an F# of Fb in both summer and winter temperatures. Playing your flute: Unlike many other wind instruments, putting the blowing end of your flute into your mouth is neither necessary or desirable. To an inexperienced player, placing the flute's blowing end into the mouth can result in extreme flooding of the flute which, in turn, leads to excessive 'watering out' (which is explained in more detail under the heading 'Care of your flute'.) Instead, place the blow hole of your flute so that it is just comfortably touching your lips. This method of playing can be seen being utilized by many experienced and professional Native American Flute players. Utilizing this method of blowing into your flute allows you to control how much air is being passed into your flute and makes for clearer and more accurate lower notes. (Flutes that are nipple ended are a slight exception although it is still only necessary to place the nipple just between the lips.) Once you get to know your flute you will have no difficulty in judging how much air to pass into it but, for now, try to remember that lower notes should be blown more gently that higher ones. For example: The most difficult note to play on your flute will be the fundamental note which is found by placing your fingers over all the playing holes. Try this - start off by blowing softly in order to establish the note and then increase the pressure by blowing a little harder. Continue to increase the air flow into the flute until you reach the point when the note will 'break'. On the lower note(s) of your flute this will not be difficult to achieve as the 'breaking' point is very close to the established note. I would, at this point, like to assure you that this is not a fault in the manufacture of your flute as most modern flutes are designed to do this so that 'over blowing' is possible. Over blowing is something that can be extremely complimentary to your playing and is used by many renowned flute players to great effect. Finally, a few words about half notes and fingering. Half notes can be achieved by placing your finger over only half, or part of, the playing hole. But, this does require a degree of practice and breath control. Do not get too despondent if you can not easily achieve this. In time, and with practice, you will be able to do it efficiently and effectively. And, do remember, as a general rule (or until you get to know and understand what your flute can and cannot do) if your finger is not placed on a playing hole then all the holes above it should be covered by your other fingers. For example, if you have a six hole flute and your fingers are not covering hole #1 and hole #2 (the farthest playing holes from the blowing end) then you fingers should be covering holes 3 to 6 respectively. Naturally, there are exceptions to this rule and you will discover them as you progress with your playing. Also, new comers to the Native American Flute may find it a little difficult to cover all the playing holes at the same time. If you are having this difficulty try moving your thumb so that it is central to your middle finger. If there is still a slight problem just keep practicing. Your fingers will manage it after a very short time! When you play your flute, be prepared to experiment and never be afraid to play what you feel. Native American Flutes were never originally intended to play with other instruments or, indeed, to play compositions by music writers so feel free to play whatever you feel like and, most important of all .... relax, enjoy and let your life be filled with peace and happiness through the music you play. Care of your flute: 1. When you receive your new flute it will be treated internally with non-toxic oil in order to prevent cracking and distortion. DO remember to keep you flute oiled at yearly intervals or sooner if the wood appears to look dry inside the sound chamber. Any application of oil (to suite your taste) will suffice just so long as it is not toxic. Just put a small amount of oil (I tend to use Butcher Block Oil) onto a soft, lint free, cloth that has been attached to the end of a thin rod, and insert it into the open end of the sound chamber. Rub the oil well into the flute. Also, pour a small amount of oil into the blow hole allowing it to totally cover the interior 'slow air chamber' of the flute. Allow the oil to soak in and 'dry' before playing. Due to the use of advanced, non-toxic, exterior finishes very little needs to be done to the exterior of your flute other than to buff it with a soft cloth. DO protect your flute from severe temperature changes. If you have kept your flute in a warm environment and decide to take it out on a field trip during a cold spell try to keep your flute warmed before you begin to play it. Many flute players who take their flutes up into the mountains, or out on cold wintry days, push the flute up their coat sleeve in order to keep it warm. This will also help to prevent 'watering out' to some extent. Watering out occurs when moist breath is blown into the flute and when the moisture collects on the bridge beneath the 'bird' or block. This temporary blockage is quite normal and can easily and quickly be removed by blowing very sharply into the flute or by holding the flute down and swinging it vigorously to remove the moisture. Always ensure your flute is dry before storing it in a flute case or any other place/receptacle. It is advisable to remove the 'bird' (block) so that excess moisture can be removed with an absorbent cloth or tissue. Make sure you loosen the leather tie so as not to damage the bridge of the flute or the base of the block. Leave the flute to dry naturally and do NOT use any heat or drying equipment (hair dryer etc.) When transporting your flute always ensure it is stored in your vehicle as far away from the heater/air conditioner as possible. Such sudden or prolonged extreme temperature changes can seriously damage you flute. Also, keep it away from any forms of heating, such as fires etc., central and/or warm air heating systems. 2. Following these simple and basic instructions will help to ensure you have a flute that will play to the delight of yourself, your family and your friends for generations to come. I sincerely hope that some of the above has been and will be useful to you. If, however, you feel you are uncertain about anything or have any questions please do feel free to contact Waking Spirit at waking-spirit@waking-spirit.com You DO NOT have to own a flute by Waking Spirit to ask for information. Waking Spirit is only to happy to help all who are interested in playing and preserving the Native American Flute. |